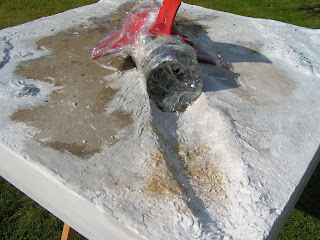
I wrapped the rocketship in clingfilm and sellotape to protect it, placed it in the trough and started to build up the wake with DAS and some small shale stones I collected while on holiday in

When the DAS was dry I coated the whole mound with watered-down PVA glue and sprinkled on some of the fine shale that was at the bottom of the box I had been keeping the stones in, this is the black or very dark grey colouring you see in some of the work-in-progress shots

The trough behind the rocket engines was modelled in a different way. I first spread ready mixed filler along the trough and when partially dry I started to add gouges into the filler both across the trough and along it. The way that the filler broke-up gives a more realistic ‘broken ground’ effect as if the rocketship has really smashed into the ground and the rocket engines have burnt the trough. Very difficult to explain in words, but once again I was happy with the finished effect. Finally I used DAS to further blend-in the rocketship to the terrain, before removing it from the hole and pealing of the clingfilm.

When I was happy with the general terrain I started to smooth out the sides, first coating the sides with watered-down PVA glue and then adding ready mixed filler. I started at the corners and when they were complete I added filler to the central sections and sanded them smooth. More filler and more sanding and the ‘block image’ I was aiming for was completed. These couple of sentences do not even hint at the amount of work this particular exercise took. After a whole weekend (and then some) the sides were flat and smooth. I am not sure if there may not have been an easier way to have done this, one that might have taken less time and a great deal less effort.

The board was now looking complete, but there was still a huge amount of opportunity to detail the terrain. I sprinkled various grades of sand and small stones across the open board, added some small cork bark pieces and even a couple of larger stones, embedded and glued into the base. When finished I airbrushed a watered-down mix of PVA glue over the whole board to seal-in the loose details.
The sides of the board and monolith were brush painted with a mix of PVA glue, Gesso and white acrylic paint, when dry I repeated the process and then lightly sanded the sides smooth. Three coats of watered-down Gesso and PVA glue and the surface of the board was sealed. In the next installment, I will detail how the board was painted.


No comments:
Post a Comment